
Almost all computers today have a hard drive. And no matter how they tried to replace it with other more reliable and faster carriers, an equal alternative was never developed. Hard drives have a number of advantages, such as large amounts of data and low cost. Among the shortcomings are quick breakdowns, damaged sectors. Many know this firsthand. Almost everyone had unpleasant moments when the hard drive with all the information accumulated over the years began to act up.
One of the ways to save a hard drive or find out about its future failure is software repair and diagnostics using the Victoria program for Windows. Although many experts say that this program does not count anything other than the number of stars on the day of the banana harvest, it still has a lot of benefits.
Firstly, thanks to the Victoria hard drive recovery program for Windows, you can quickly detect bad sectors and mark them as non-working. After that, they will not be read at all, and, therefore, there will be no freezes and errors when reading.
Secondly, Victoria under Windows makes excellent diagnostics. The speed of diagnostics is not slower than in Victoria under DOS. After the diagnosis, you can always find out how much is left for your disk and whether you need to do treatment under paid versions of the program, or under DOS.
Thirdly, Victoria for Windows is very easy to use and does not require much knowledge. Even the most inexperienced beginner can run a series of tests that will show interesting results.
Let’s look at an example of checking and restoring a hard drive using Victoria. The application itself, as a rule, is distributed in an archive without an installer. And you do not need to install it: the program is distributed without an installer and fully works without installation. The size of the program does not exceed 600 kilobytes.
After the archive with the application is unpacked, you need to run the application itself. To do this, select the green cross icon and click on it. After that, you will be prompted with the program window. At first glance, everything seems complicated and incomprehensible, but in fact everything is very simple. Switching between tabs changes between basic information about the hard disk, or “passport”, and other program functions: information about the disk status, testing, deep work with sectors, settings. Let’s look at these tabs one by one below.
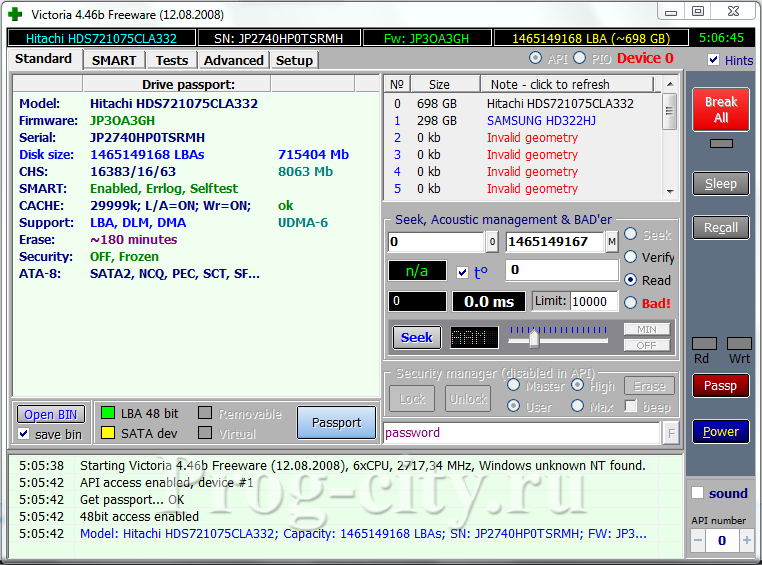
Standard.
In this tab, you can get basic information about the hard drive: model, firmware, serial number, and other additional data. In order for the program to read data about the disk, click “Passport”.
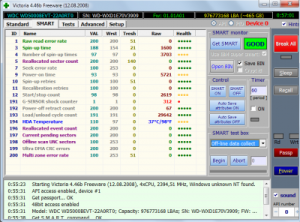
Here you will find the basic information that the hard drive reports. This is a series of test results for reading and writing, health and responsiveness of the hard drive. The information is presented by a number of tests, the transcript of which you will find on the Internet. To get the results, click “Get SMART”.
TEST.
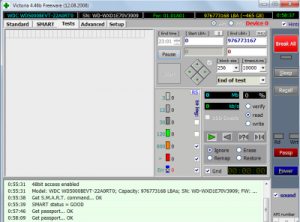
In the TEST tab, what we need is testing for errors and fixing them. This tab needs to be analyzed in more detail. On the left, in the working area of the program, we see a number of different cubes (rectangles). These are sectors. During testing, each cluster will be marked with a color that characterizes its state.
Gray sectors are good sectors.
Green – those that respond more slowly, their reading requires more time. However, they are also in good condition.
Orange. Orange sectors indicate a very long reading. As a rule, it is they who create the braking of the hard drive. When testing, there should be no more than 50 (approximately). They are working, but will soon fail. They cannot be restored.
Red sectors are damaged or cannot be read. Can’t be restored. The presence of such sectors indicates that you need to think about changing the disk.
Blue with a cross. Blue sectors with a cross are those that caused a failure when reading. Information from them cannot be recovered. It is necessary to re-partition such sectors so that the hard drive does not write to or read data from them. This is done using the “Remap” option, which you will read about below.
Also in the settings panel you can find round toggle buttons Ignore, Erase, Remap, Restore.
Ignore. This option tells the scanner that no changes need to be made. We ignore bad sectors.
Erase. The Erase option conveys that sectors need to be overwritten.
remap. This option must be enabled when you need to repartition bad sectors. Having found an error, the program marks the sector as non-working and replaces it with a healthy one.
Restore is used when a sector needs to be restored. Only available in the paid version.
After all the settings are set, you need to click “Start”. The program for checking the hard disk will scan the hard disk for a long time, which can take about a day or more if there are errors. A lot also depends on the size of the disk. A good disc is quickly checked.
In conclusion, I would like to say that checking the hard drive with the Victoria program will not save your drive, just as cosmetics do not save a person from old age. If your disk has grown old, then this is an irreversible process and cannot be returned. Sectors fail one by one, and their recovery does nothing. If there are dead sectors, it means that there will be more soon. It happens like a nuclear bomb explosion, a chain reaction. Therefore, if there are bad sectors, you need to change the disk and copy the information while it is available.